iCloud DNS Bypass 2020/2019 for Locked iPhone or iPad

Summary: iPhone or iPad DNS Bypass is a popular solution for iCloud locked devices, read on to learn more about this.
Have you purchased a second-hand iPhone/iPad and its iCloud Activation Lock is enabled? Or you own an Apple device, but have forgotten its iCloud password? In either situation, you can’t use locked devices without iCloud activation.
You may try to contact Apple customer support, but they are not going to help you straightforward without user authentication. You will be asked a lot of questions, and they may demand the original iOS device payment receipt, even after the authentication of the device.
To avoid these complications, one of the best free ways is to get your Apple device unlocked using iCloud DNS Bypass.
Part 1. What is “iCloud DNS Bypass”?
Every time you setup your iOS device after a factory reset or restore, your iOS device will sent an activation request to Apple server. Apple processes the request and shows the status of your device. And if your device’s Find My iPhone function is turned ON, iCloud Activation Lock screen will pop up, asking you to provide iCloud account login details.
If you have forgotten your login details (Apple ID or password), or you get a second-hand device with iCloud lock enabled, then the iCloud DNS Bypass is here to help you. It is one of the iCloud Unlock free method.
Domain Name System (DNS) converts the readable names into numerical IP addresses. It uses the DNS server which acts as a host to run the application. If your device is iCloud locked, a great way is to change its activation path using the DNS method and send it from the original Apple server to iCloud Bypass DNS server for authentication.
Believe it or not, bypassing Apple’s iCloud DNS isn’t as complicated as it sounds.
You can change the IP server path in the device’s WIFI settings, even if the activation screen is popped up and you are not able to use the device. There is an option for you to enter the manual WIFI setting and change the DNS address.
Once it is DNS activated, you will be able to use several apps, surf the internet, play games, use the camera, and more on your iOS device.
1.1 The Limitation of iCloud DNS Bypass
- There is no assurance that it will always work to unlock your device.
- DNS activated doesn’t allow you to access all the features of an iOS device. You will have access to limited features.
- It doesn’t work for all versions of iOS devices. It may prove effective for iOS 8 to iOS 10 devices, and may not function for other versions.
- iCloud DNS Bypass is just a hack to use your Apple device and not a complete unlock. For a complete iCloud unlock, try iCloud IMEI Unlock service.
Part 2. The Verified iCloud DNS Bypass Method in 2020/2019
iCloud DNS Bypass 2019 is a simple and short method. Here is step by step guide to DNS Bypass your iCloud locked iOS device.
2.1 Steps for DNS Bypass iCloud Activation Lock
Note: Before performing iCloud DNS Bypass captive portal, make sure that your device has SIM card installed as it is necessary to complete the process.
Step 1: On the screen, choose your country and language from the menu.
Step 2: Once you proceed it, you will be directed to the WIFI setting page, asking you to connect to a WIFI network. Alongside the WIFI network, look for ‘i’ symbol.
Note: if you don’t see ‘i’ symbol alongside WIFI network, then press Home Button> More WIFI Setting, and look for it.
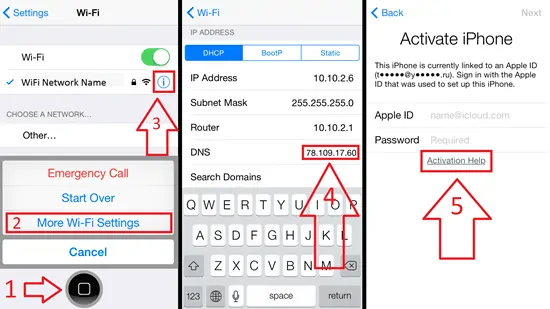
Step 3: You need to disconnect to the WIFI network. Once you find ‘i’ symbol, go to the connection settings and select Forget this Network.
Step 4: Now, click ‘i’ and enter a DNS server to bypass iCloud Activation Lock according to your location, against DNS tab. Choose the one from the list below:
2.2 iCloud Bypass DNS Server IP Addresses
USA: 104.154.51.7
South America: 35.199.88.219
Europe: 104.155.28.90
Asia: 104.155.220.58
Australia and Oceania: 35.189.47.23
Other continents: 78.100.17.60
South America: 35.199.88.219
Europe: 104.155.28.90
Asia: 104.155.220.58
Australia and Oceania: 35.189.47.23
Other continents: 78.100.17.60
Step 5: After entering DNS IP, tap the Back option at the left of the screen. Now, turn on WIFI, select the WIFI network from the list and enter the password.
Step 6: You will see the option of Next page, don’t click it and press Back. Now you are on iCloud Bypass screen.
Step 7: Scroll down the page, go to the Menu and set up your apps, music, internet, camera, etc.
2.3 Advanced Tip: How to Use iCloud DNS Bypass “Crash”
After the above steps, you’ll be able to use part of the functions of your iPhone. In fact, no one wants to use partial functions since they paid a lot to get the iPhone. So, I’m going to introduce further instructions to enable you to use your iPhone as normal via Crash.
Note: This tip can only allow you to use your iPhone/iPad temporarily because your device will be locked again after reboot. So, never reboot your device unless you have to.
Steps to Use iCloud DNS Bypass Crash Method
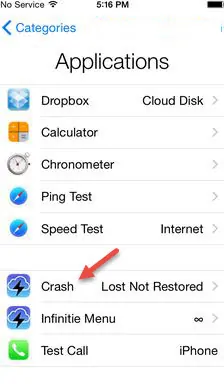
Step 1. After using the above method mentioned in part 2.1, tap on the “Menu” > “Applications”.
Step 2. Then find and tap on the “Crash”. Your iPhone will restart automatically.
Step 3. Wait until your iPhone restarts, choose the “Language and Country”. Then you’ll be directed to ‘Choose a WiFi Network’ interface.
Step 4. From that interface, tap on Home button and then the “More WIFI Settings”.
Step 5. Tap on the ‘i’ symbol next to your WIFI. Then go to “Menu” > “HTTP Proxy”.
- Clear the existed HTTP address and list 30 distinct emoji icons to the “Server” zone
- Type ‘8888’ over the “Port” Zone.
Step 6. Now hit the “Back” option and then the “Next” option. You will be directed to see the unlock screen, press the Home button to unlock it.
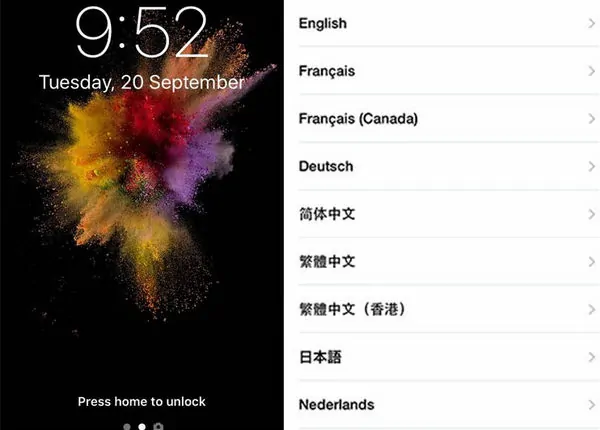
Step 7. Hit the language option until the home screen shows up. Then you’ll be able to use more functions in your device!
Part 3. iCloud DNS Bypass Not Working? Try an iCloud Unlock Service
If the above iCloud DNS Bypass method not working, you can try an alternative solution – iCloud unlock service for your locked iOS device (including the latest iPhone 11), here we recommend you try AppleiPhoneUnlock.
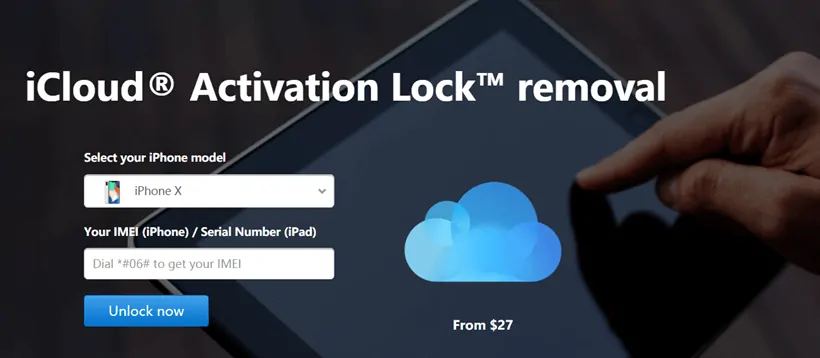
AppleiPhoneUnlock is a reliable iCloud unlock service, which not only works for all Apple devices but also removes an iCloud lock from your iOS/iPadOS/watchOS device permanently, allowing you to get full control of your device and use all of its features.
3.1 Verified Solutions for “iCloud DNS Bypass not working”
AppleiPhoneUnlock provides easy service to unlock your device using your device’s IMEI number only. Follow these steps to remove the iCloud account from your device when iCloud DNS Bypass server not working.
Step 1: Get device’s IMEI Number
- For activated device: Dial *#06# to get IMEI number or Tap Settings>General>About>look for IMEI number.
- For inactivated device: Go to activation screen, look for ‘i’icon, tap it and get your IMEI number.
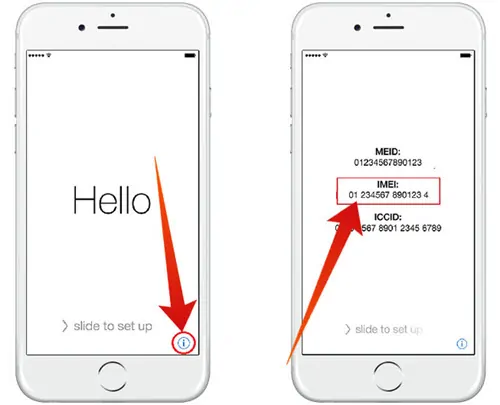
Step 2: Go to AppleiPhoneUnlock website, provide them your IMEI number, and click Unlock Now, after selecting the device model.
Step 3: Proceed the payment and let them remove the iCloud lock from your Apple device. It usually takes them 24-72 hours to complete this process. Once done, you are ready to use your iOS device without any interference.
Here is the details about how they unlocked our device:

Is AppleiPhoneUnlock Worth Trying?
You might doubt iCloud unlock service as illegal, however it carries the process legally. Here are some of the reasons why you should have a try at AppleiPhoneUnlock.
- If you try to contact the Apple customer care, they will ask you to provide the evidence that you own this device. In case, you have lost the receipt for device purchase, you will have to contact the original seller, which is a hectic task, specifically if you have made an online purchase. Thus, iCloud unlock service saves your time and worth for the money you spent on your phone.
- You might fear scam, but AppleiPhoneUnlock overcomes all your fears by providing you 100% money-back guarantee.
- Moreover, they use verified SSL (HTTPS) to ensure that your IMEI is secure and not misused.
Customers Trust on AppleiPhoneUnlock
AppleiPhoneUnlock is a trustworthy and reliable iCloud lock removal service with thousands of satisfied customers. Their customers trust them for their fast services, efficient customer support, and keeping a track of services. Five-star ratings from their confident customers show the reliability of their iCloud unlock services.
UpdateWe tested AppleiPhoneUnlock service on our iCloud locked iPhone 6, iPhone 8 and iPhone X, they were unlocked successfully within 3 days (you can check the unlock details above). Apart from this service, we also tested some unlocking software, but none of them worked, they are:
2020 Updates: Common Questions about iCloud DNS Bypass
Q1. Can I use iCloud DNS methods on my Apple Watch?
Nope! This method can only work for iPhone/iPad (iOS 8 ~ iOS 11).
Q2. I am in Nigeria (Africa) can I access their AppleiPhoneUnlock?
Of course, there is no limits on geographical restrictions.
Q3. I cannot bypass using the DNS server, can I sent the device to you?
Sorry that we do not offer this kind of service. Please try again or use the alternative method.
Q4. Can you promise that AppleiPhoneUnlock will succeed?
You need to know that AppleiPhoneUnlock is not our website/service. We recommend it because we found it useful for our devices after testing. If you’re confusing, just contact their support to confirm.
What’s more, they offer a money-back guarantee if they failed to unlock your device.
Q5. How much does it cost to unlock?
- The iCloud dns bypass method is free but not all devices are supported.
- The price of AppleiPhoneUnlock service is always changed due to promotion, you can check the real-time price from here.
Q6. I don’t have the money to pay for service, can you help me unlock?
We launched the “Lucky Dog” plan from Nov 1, 2019. We’ll help three users to unlock their device for free each month. The “lucky dog” will be chosen randomly from those who leave a comment or share our post to their social media.
Final Words
With the iCloud lock enabled, it is common to expect that your Apple device gets locked, restricting you to use it. However, iCloud DNS Bypass is an efficient way to hack your device and use it with limited features.
In order to enjoy the device functionality at its fullest, it is recommended to use an iCloud unlock service – AppleiPhoneUnlock. It supports all iOS versions, including the latest iOS 13, iPadOS & watchOS 6.
iCloud DNS Bypass 2020/2019 for Locked iPhone or iPad
 Reviewed by Unlock iCloud
on
February 14, 2020
Rating:
 Reviewed by Unlock iCloud
on
February 14, 2020
Rating:

